
The Queen Charlotte Track is a beautiful 5-day hike in the northernmost region of New Zealand’s South Island: the Marlborough Sounds.
You can explore the Queen Charlotte Track in many different ways. From camping to staying in luxury accommodation, guided hikes, doing day walks or even mountain biking.

It is literally a ‘choose your own adventure’ type hike.
This is a very long post so you may want to get a cup of tea first.
Disclaimer: This post contains affiliate links.
THE QUEEN CHARLOTTE COAST TRACK: THE BASICS
Like the Abel Tasman Coast Track, the Queen Charlotte Track (QCT) takes you through gorgeous coastal scenery in the northern parts of the South Island.
Being in the middle of the Marlborough Sounds, you’re never far from civilisation but it is nevertheless a very relaxing hike.
And the views of Kenepuru Sound and Queen Charlotte Sound (Totaranui) are just stunning. (Note: A ‘sound’ is similar to an inlet, ie. a wider body of water connected to an ocean or a sea.)

Initially created by passionate local landowners in the 1980s and officially opened as a multi-day trail in 1991, parts of the Queen Charlotte Track take you through private land to this day. You’ll need a permit to hike through these sections (mostly on Day 3 and 4).
We ended up hiking the QCT because we had to cancel the Milford Track earlier that year, and were looking for another hiking option.
In its entirety, the Queen Charlotte Track may not be awe-inspiring but it is beautiful and I’d absolutely recommend it, especially if you’re a keen hiker.
THE QUEEN CHARLOTTE TRACK AT A GLANCE

DISTANCE: 73.5KM (or 70km/75km depending on which sign you want to believe)
TIME: 4-5 days (or shorter/longer)
GRADE: intermediate
START POINT: Picton (Ship Cove/Meretoto)
END POINT: Anakiwa
PERMITS: Department of Conservation (camping) + Private Land Track Pass
FEES: Track Pass $30 pp (+ camping fees if camping)

PERSONAL ENJOYMENT RATING: 4/5
TRACK ROUTE
Most hikers will start their Queen Charlotte Track adventure from Picton, a pretty little town from where the Interislander Ferry to the North Island (Wellington) leaves.
The northernmost trailhead is Ship Cove (Meretoto) with the small settlement of Anakiwa located at its southernmost end.

You can walk the trail in either direction but by far the most popular way of hiking the 73km track is north to south (Ship Cove to Anakiwa) in about 4-5 days.
We decided to do hike the QCT over five days, mostly because I didn’t want to push myself too hard since we hadn’t gone on any long hikes that year. We also didn’t want to rush and five days meant we still had time to relax at the end of the day.
Plenty of people hike the trail in four days but you’ll have longer days on Day 3 and 4 then.
On this hike, you have the option to camp or stay in private accommodation each night. There are no Department of Conservation (DOC) huts along the QCT.
TOILET ACCESS
Toilet access is very good on this hike with toilets at each of the campsites plus a fair few more at strategic intervals (shown on the DOC map).
The only section that has no toilets is the ridge section between Bay of Many Coves campsite and Black Rock campsite (8km) as you’re traipsing mostly through private land.

We had spare toilet paper but it wasn’t needed.
ELEVATION PROFILE
The Queen Charlotte Track is about 73km with some elevation. It is largely undulating and feels like constant up and down but if you’re reasonably fit, you’ll be fine. I found Day 3 the hardest.

It’s a perfect multi-day hike for beginners.
There are a couple of side trips to lookouts and while each is steep they’re worth it. The side trips take you to summit lookouts and you’ll get amazing panoramic views over the sounds.
Day 1 and 2 have minor elevation. On Day 3 you literally climb from sea level (if staying at Camp Bay/Punga Cove) to the ridgeline at around 400m. Somehow I found that really tough going but it could also just be because I wasn’t exactly in the fittest state I’ve ever been in.

Day 4 was our favourite day because there are lots of views as you make your way along the ridge between Queen Charlotte Sound and Kenepuru Sound.
BEST TIME TO HIKE THE QUEEN CHARLOTTE TRACK
The track is open year round as the weather tends to be milder on the northern end of the South Island. We hiked in early October and had mostly great hiking weather. The temperature hovered around 15-18°C and it was partly cloudy with intermittent showers on some days.
Our first day was pretty fresh (warranting beanies) but then the weather cleared up and we even hiked in short-sleeves by the end of it.

The Marlborough Sounds region is known for its sunny weather even in winter but rain, of course, can strike at any time of the year. The region is fairly quiet over the colder months and you may struggle to book accommodation as a few close in the off-season.
Much like the Abel Tasman Coast Track, the Queen Charlotte Track is probably best hiked from spring to autumn. Ideally go outside the main holiday season (Dec/Jan) when the Marlborough Sounds can get very busy with holidaymakers.
QUEEN CHARLOTTE TRACK: HIKING OPTIONS
Unlike more structured trails like the Milford Track, your options for hiking the Queen Charlotte Track are nearly endless.
If you don’t want to hike the entire trail, you could just do a section of the QCT and get water taxis to/from almost any point on the trail. Alternatively, you could kayak some/all of it, and do it as a water adventure. Or mountain bike the QCT if you prefer a cycling trip.
But not only can you choose your length, you can also decide your ‘comfort level’ on this hike. You’ll find some options below.
OPTION 1: INDEPENDENT HIKING PACKAGE OR GUIDED WALK
If you don’t have the inclination or the time to make the arrangements yourself, there are tour operators that take care of everything for you.
Think of it like a ‘self-guided hiking package‘: You choose the length of your hike, accommodation/room standard and any included activities. The tour operator books all your accommodation, transport, luggage transfers, some meals and any additional activities.
The cost usually starts at around NZ$1,200 per person (and up, depending on your accommodation standard).
You don’t walk with a group as such. You just book the logistics arrangements and hike each day independently. Most people we met on the trail had organised their hike that way.
If you prefer to walk with a dedicated group, you can book a fully guided walk. In that case you’re looking at more like NZ$2,500 per person.
OPTION 2: DIY HIKE (ACCOMMODATION / CAMPING)
When I looked at the costs for making arrangements through a tour operator, I did some quick calculations and worked out that I could easily slice off $1,000 if I organised everything myself. (Accommodation prices have significantly increased since our hike though.)
It takes a bit of logistics juggling but if you’re flexible with dates and a planner sort of person, it’s quite doable.
For a relaxed and less ‘pack-heavy’ experience, book into lodges, resorts or B&Bs each night, and have your luggage transported to your next accommodation each morning. More below if you want to know exactly what we did.
For a much cheaper alternative, you can camp along the trail.
OPTION 3: DAY WALKS
Another option is to pick an accommodation provider, stay there for a few nights and hike the track in both directions over a few days. You can arrange for water taxi pickups back to your accommodation each afternoon.
Alternatively, you could do a day trip from Picton to the Queen Charlotte Track and hike for a day. You would still see a bit of the trail and the beautiful scenery around the Marlborough Sounds.
You can also access a few points along the trail by car. The northern sections past Camp Bay are inaccessible as Kenepuru Road ends there. Beware that Kenepuru Road is very, very, very windy and takes ages to drive.
HOW TO PLAN YOUR HIKE ON THE QUEEN CHARLOTTE TRACK
If making your own logistics arrangements for the Queen Charlotte Track doesn’t scare you, you’ll need to organise the following:
- Accommodation for one night in Picton pre-hike (and post-hike depending on your plans)
- Boat transfer to/from the hike (water taxi to Ship Cove from Picton; bus/water taxi from Anakiwa)
- Luggage transfer each day (unless you want to camp or carry everything)
- Accommodation/campsite for each night on the trail
- Food
- Private land fee permit (track pass)
A word of caution: You have to be prepared for things to go wrong and to rearrange things. Travel insurance is obviously a very good idea if you’re making your own bookings.
One of the accommodation providers cancelled on us (due to flood damage) so I had to find alternative accommodation for one night. Not an easy feat given limited options along the track. It actually turned out better than initially planned but I didn’t know that at the time.
If you’re booked with a tour operator, they will take care of any unforeseen changes and make the hike stress-free for you.
GETTING TO THE QUEEN CHARLOTTE TRACK: WATER TAXI AND LUGGAGE TRANSFERS
Since there’s no road access to Ship Cove, you need to take a water taxi from Picton (about 1 hour). At the end, you can either take a bus from Anakiwa or another water taxi across the inlet back to Picton.
If you decide to stay in accommodation, your luggage can be transferred to your next accommodation provider and you walk with a daypack only.
There are two water taxi operators in Picton: Picton Water Taxi or Cougar Line. We used Cougar Line and booked the Round Trip Track Pass (includes luggage transfer each day).

For the luggage transfers, you simply drop off your bag at reception (or wherever they tell you to leave it) in the morning, and then collect it from the next place you’re staying at.
We found that our luggage always arrived at our next accommodation before we did, and was usually delivered directly to our room.
We used a waterproof duffel bag since your bag may or may not get stored outside during the day or may get wet on the boat. If you don’t have waterproof luggage, packing your spare clothes etc. in dry bags is a great option so everything stays dry.
WHERE TO STAY: ACCOMMODATION OPTIONS
There are a few accommodation options along the Queen Charlotte Track but it’s not a huge amount of choice. So book early, especially if you want to go over the busy summer break (Dec-Jan).
The Queen Charlotte Track website is useful for planning your adventure and includes a list of accommodation along the trail.
If you’re going with a tour operator, whether independently or as a guided hike, you’ll most likely stay at Furneaux Lodge, Punga Cove Resort, the Portage Hotel and Lochmara Lodge.

We split our hike up differently and chose Ngahere Hou (halfway along the trail) instead of the Portage Hotel, and then onto Mistletoe Bay Eco Village for our final night.
You can read more on our accommodation in the trip report below.
CAMPING ON THE QUEEN CHARLOTTE TRACK
You can camp in six official DOC campsites and/or a couple of private campgrounds along the track.
You need to pre-book the DOC campsites but they’re very affordable ($10 pp/pn). Some have picnic tables and/or cooking shelters. Others have nothing more than a drop toilet and (non-potable) water.
On Day 4, you could also stay at Mistletoe Bay Eco Village, which offers both cabins and campsites ($18 pp/pn).
More thoughts and photos on each campsite below in our trip report.
HOW WE PLANNED OUR QUEEN CHARLOTTE TRACK HIKE
Our accommodation choices were dictated by what was open by early October (post-pandemic and still slightly in the off-season). Quite a few providers opened later in the season.
This is how we organised our Queen Charlotte Track hike:
- Hiked over 5 days, north to south (Ship Cove to Anakiwa)
- Booked accommodation in Picton: Jasmine Court Motel (pre-hike; ok for one night) and Harbour View Motel (post-hike; nice views over the bay and very close to the main street with restaurants, cafes and shops)
- Booked four accommodation providers along the Queen Charlotte Track, one night each
- Furneaux Lodge – Hiker’s Cabin
- Punga Cove Resort – Koru Chalet
- Ngahere Hou (B&B) – Yurt
- Mistletoe Bay Eco Village – 2-bunk Whare (cabin)
- Organised water taxi transfers from/to Picton with Cougar Line (Round Trip Track Pass) that included daily luggage transfers; caught the first water taxi to Ship Cove at 8am on Day 1 and back from Anakiwa around 3:30pm on Day 5
- Hiked with day packs only
- Organised payment of private land fees: Queen Charlotte Track Land Cooperative Pass
- Self-catered (except for dinner at Furneaux Lodge): We brought some (allowed) snacks from Australia, bought some food in Christchurch and also went food shopping in Picton
I generally chose the most basic private room type. We could have stayed in dorms too but unless it’s a hiking hut, I’m a bit over dorms and will choose a private room every time.

GETTING TO/FROM PICTON
On this trip to New Zealand, we didn’t hire a campervan and simply flew into Christchurch. We stayed a couple of nights at the Quest on Manchester (because = kitchen + close to supermarkets) to get over the late night arrival and buy food for the hike.
We then took an early InterCity bus from Christchurch (7:30am) arriving in Picton by lunch time. The bus took about 5.5 hours and was a total breeze. I’d definitely recommend it if you don’t need a car.
After the hike, we stayed another night in Picton and then took the Interislander Ferry to Wellington.
COSTS
The majority of your costs will go towards accommodation. And that’s not necessarily cheap along this hike (and gone up in the last year or so).
If you’re on a tight budget, camping would reduce your costs significantly (e.g. down to $40 per person for a 5-day hike).
We spent:
- Accommodation on the trail: NZ$705
- Water taxis (round trip): NZ$110 x2 (2025: $140)
- Queen Charlotte Track Land Cooperative Pass: NZ$30 x2
- Total: NZ$985 (~AU$890) (2 people)
Added to that was the food we bought pre-hike and the dinner we splurged on at Furneaux Lodge.
USEFUL GEAR TO PACK
Since we didn’t camp on this hike, we didn’t need to pack quite as carefully and so had the luxury of adding things like maple syrup for breakfast porridge. We packed spare clothes, food (breakfast, dinner + snacks), a book each, etc. in our large duffel bag, and only carried daypacks (water, daily snacks + lunch, rain gear, valuables and camera gear).
Here are a few things that were useful on this hike:
- Map: You don’t really need much of a map for the QCT, it’s well signed posted (despite varying distances) and you can’t get lost since there is only one trail. The DOC map was entirely sufficient.
- Hiking stove + gas: Since we self-catered (except for Furneaux Lodge, unplanned dinner outing), we stuck to our basic hiking meal plan (mostly rice + tuna). If you’re flying in from Australia or elsewhere, you can only buy gas for your hiking stove in Blenheim (Macpac store), Nelson or other larger towns. When we did the QCT, we bought it at Sportsworld in Picton (which, sadly, is now permanently closed).
- Hiking poles: For the most part, the track is wide and well-graded but hiking poles come in handy on the downhill sections, especially if you have trouble with knees and ankles.
- Water bladder: I only carried a small daypack that held my 2L Osprey hydration bladder and a few snacks for the day. I found that the 2L capacity (+ a 0.5L bottle for electrolytes) was sufficient for this hike given that it wasn’t too hot. We could also fill up (unfiltered) water at each of the campsites.
- Insulated water bottle: We often carry an insulated 750ml water bottle (thermos) when hiking in colder weather. I fill the thermos with fruit tea in the mornings and we usually have it at lunch. Even in cold weather, the tea stays reasonably warm and fruit tea works well even if it’s cooled down (lukewarm black tea is not that great).
- Merino socks: I can’t even remember the last time I went on a hike not wearing merino socks, it’s been more than a decade, I think. I tend to wear Icebreaker merino socks as they come in different thicknesses and last well. On this hike I wore mostly ‘Hike+ Medium’ weight.
- Compeed blister patches: We rarely need them as our shoes or boots tend to be well worn in when we go hiking but these patches are a constant companion for those just-in-case situations. When I’ve had to use them, they work like a charm (though the patch can get stuck on the woollen socks!).
- Sanitary items: Hand sanitiser for use after the drop toilets, I prefer natural hand sanitiser like Koala Eco. We didn’t need our own toilet paper this time but I don’t want to be caught out so always carry some in a ziplock bag. I also always carry a Kula cloth; as a female, these tiny cloths have revolutionised my outdoor toilet experiences (seriously, I cannot recommend them highly enough!).
- Rubbish bag: There are no rubbish bins along the Queen Charlotte Track and even some accommodation providers are rubbish-less (e.g. Mistletoe Bay Eco Village) so take a large ziplock bag for your snack wrappers or other rubbish. Follow leave no trace principles while hiking in this beautiful environment.
HIKING THE QUEEN CHARLOTTE TRACK: ITINERARY AND TRIP REPORT
After arriving in Picton the day before, we got up bright and early to start our Queen Charlotte Track hike.
All that was left to do was to lug our big duffel bag down to the marina, check in for our water taxi ride and enjoy hiking on a drizzly day.
DAY 1: SHIP COVE (MERETOTO) – ENDEAVOUR INLET (FURNEAUX LODGE) | 17KM (NO SIDE TRIPS)
Day 1 starts with a water taxi transfer from Picton Marina to Ship Cove or as close as they can get you if the sea is very rough. If the water is too choppy, the water taxis may not go all the way to Ship Cove as it’s somewhat unprotected and they have to go into rougher waters (being closer to the open sea).
For us, the day was marked by drizzle and low clouds but nothing serious enough to warrant getting our full rain gear out (yet). It seems that Day 1 is always a bit miserable for us (with the exception of the Three Capes Track and the Larapinta where we had perfect weather).

I was hoping for calm conditions for the early morning boat ride (8am) but with low clouds, conditions weren’t exactly ideal. In the end, it was a bit choppy out on the open water but I find that sea bands (acupressure points) and peppermint oil help stave off most of the nausea.
Our captain wasn’t super keen to go to Ship Cove but we talked her into giving it a go, and we made it just fine.

At Ship Cove, you could explore the historic site first. There are a few information panels about Maori activity in the area and the later European arrival but the drizzle made reading these less enjoyable, and we soon headed off.

From the jetty, the wide track leads into the forest, past beautiful little waterfalls and up onto Ship Cove Saddle.

The views into Queen Charlotte Sound from the saddle weren’t quite as stellar as they could have been, and we only lingered as long as it took to don our rain pants. The rain was getting heavier now.

From the saddle the track drops down into Resolution Bay and the first DOC campground, Schoolhouse Bay.
The track then winds around to Endeavour Inlet, weaving in and out of the forest and up and down the hills. For us it was overcast and windy but otherwise you’d get terrific views over the sound.

Eventually the track flattens out and then it’s a straight walk into the settlement and to Furneaux Lodge.
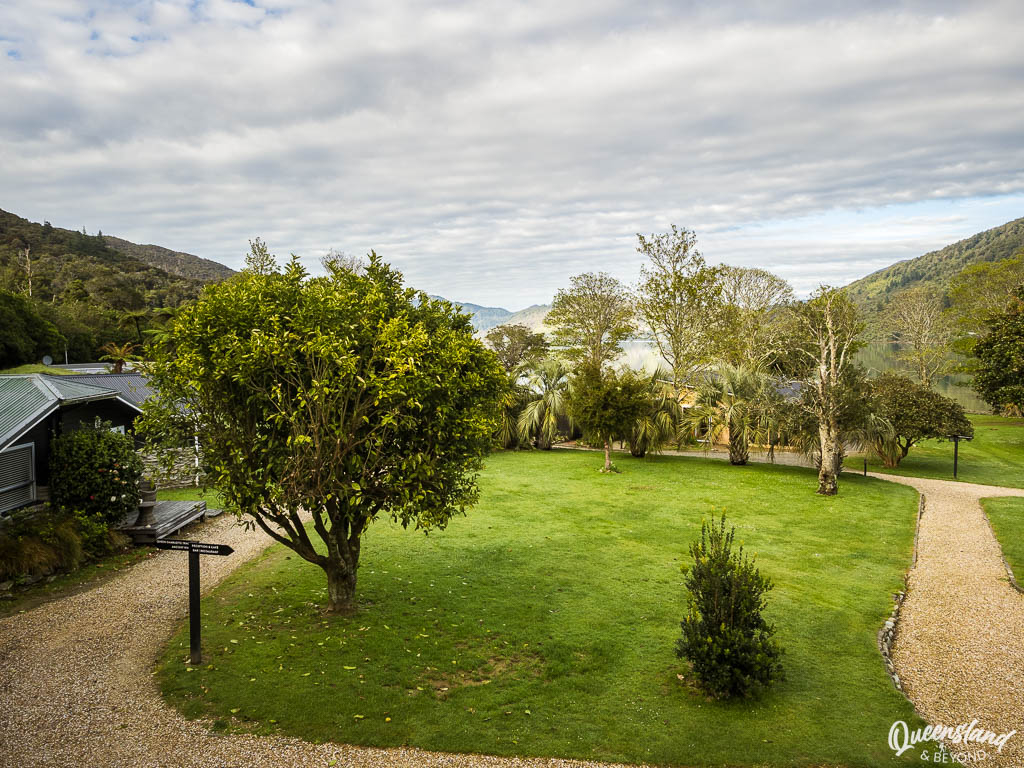
ACCOMMODATION: FURNEAUX LODGE
Furneaux Lodge looks beautiful.
The grounds are manicured, the lodge itself is a stunning heritage building, the outlook onto the bay is lovely.

Best of all, we very unexpectedly got upgraded to a spacious Tobias Junior Suite because they were renovating the (budget) Hiker’s Cabins that I had actually booked.
We felt slightly underdressed for our spacious luxury accommodation but that didn’t stop me from whooping for a fair few minutes.


Whatever accommodation option you book, your bags will likely already have been taken to your room/cabin by the time you get to Furneaux Lodge.
We decided to have dinner at the lodge (once the husband established that they would be able to cook a strictly gluten-free meal), and dinner (Fiordland venison and local fish) didn’t disappoint.
If you want to splurge, this would be the place.
CAMPING OPTION: SCHOOLHOUSE BAY (6KM)
SCHOOLHOUSE BAY CAMPSITE (DOC)
FACILITIES: Drop toilet, water
CAPACITY: 14 people
COST: $10 pp/pn - pre-bookings required
The first camping option is at Resolution Bay.
The Schoolhouse Bay campground is only 6km from Ship Cove so the first day would be pretty short. But you could leave Picton later in the day and also spend more time at Ship Cove and explore the historic site.
The next day would be much bigger but once you’ve dropped down to Endeavour Inlet, it should be a fairly flat walk to Camp Bay.
The camping area itself is pretty much at sea level, and though wet and soggy, still looked inviting enough with great views over Resolution Bay.


I couldn’t really see any picnic tables beyond one lonely bench and a picnic table almost on the beach but maybe some others were hiding elsewhere. There’s no cooking shelter here.
DAY 2: ENDEAVOUR INLET (FURNEAUX LODGE) – CAMP BAY (PUNGA COVE) | 0KM (11.5KM) (NO SIDE TRIPS)
Day 2 is the easiest on the QCT as it’s almost entirely flat and the track just winds its way around Endeavour Inlet to Camp Bay.
A terrible weather event had hit this northern region a couple of months earlier and a landslide and storm damage took out sections of the track along Endeavour Inlet (and also flooding one of our accommodation providers).
Since this section of the QCT was still closed when we hiked it (or wanted to hike it), we ended up having to catch a water taxi to Punga Cove in the late morning and giving most of this part of the walk a miss.

So indeed, Day 2 was our easiest day! 🙂
After checking into our adorable A-frame cabin, we decided to backtrack and walk as far towards Furneaux Lodge as we could.

We managed to hike around most of Camp Bay until we got waylaid by a mass of trees that we didn’t feel like climbing over to continue.

Up to that point, the track is wide and made for easy walking. It can get muddy on the QCT as the soil is mostly clay-based and can really stick to your boots.
ACCOMMODATION: PUNGA COVE RESORT
The chalets at Punga Cove Resort are adorable and nestled into the hillside.

This was our (planned) splurge night, staying in one of the Koru Chalets. It’s such a luxury to have a shower at the end of a day of hiking and sleep in a bed!


We enjoyed our cozy chalet with views over Camp Bay, though I’d have preferred to be more tucked away rather than directly on the path where everyone traipsed past.
We ended up cooking our dinner on the little verandah and eating out on the steps.
CAMPING OPTION: CAMP BAY (26.5km)
CAMP BAY CAMPSITE (DOC)
FACILITIES: Flush toilet, water, cooking shelter
CAPACITY: 45 people
COST: $10 pp/pn - pre-bookings required
There’s a DOC campsite at Camp Bay, not far from Punga Cove. Unlike Schoolhouse Bay, the ground looked a bit more uneven.

You could camp here and then enjoy snacks or pizza at Punga Cove, especially if you came in summer months when the Boatshed Cafe is open.
There’s a basic cooking shelter at Camp Bay but no picnic tables as far as we could ascertain.
DAY 3: CAMP BAY (PUNGA COVE) – NGAHERE HOU | ~12KM (WITH SIDE TRIP: ~15KM)
When we’re not camping on hikes, we somehow don’t manage to get off very early. At 8am, we were still having breakfast – porridge complete with dehydrated kiwi fruit (who would have thought that could be a thing?!).

Day 3 was back to a full day’s walk, and our first day across private land.
This day is probably the hardest day on the trail as the track takes you up to the highest point along the QCT, to 467m above sea level at Eatwell’s Lookout.
For most hikers it’s also the longest day if you’re staying at the Portage Hotel (about 23km). We split that day in half and only walked about 12km (plus a side trip) on Day 3.
On Day 3 you also catch the first glimpses of Kenepuru Sound as you reach Kenepuru Saddle and get to splendid lookouts along the trail.

The day starts off with an uphill climb through forest and it doesn’t really feel like you’re getting a break from the uphill until you’ve reached the ridgeline past the Bay of Many Coves campsite.

Before you get there though, Eatwell’s Lookout is a short but steep detour (about 3km return) with beautiful views over Queen Charlotte Sound (Totaraniu).

The track weaves in and out of the forest as you climb up and drop down again. Undulating would be a mild way to put it! I found it exhausting…


We were initially going all the way to the Portage Hotel to stay the night there but since our booking got cancelled (due to storm damage), we ended up staying much closer at Ngahere Hou.
Just after 3pm, we finally reached Ngahere Hou, and what a find it was!
SIDE TRIP: EATWELL’S LOOKOUT
Leaving Camp Bay, there’s only one side trip to explore along the way to Bay of Many Coves: Eatwell’s Lookout (3km return), named after the founder of the QCT, Rod Eatwell.
It’s a deceptively steep track up to the lookout but the views are worth it!


There’s a happily situated picnic table for lunch and also a quirky sign telling you how far you are from everywhere. Out here, it seemed strange to think that Wellington was only 53km away.
ACCOMMODATION: NGAHERE HOU
Well, Ngahere Hou was more than a delightful little surprise!

This little B&B is tucked away on the Kenepuru Sound side.
It’s a bit of a hike to your accommodation from the QCT (about half an hour) as you descend from the ridgeline and make your way down to almost sea level.


You first head down a very steep fire trail, enter a back gate and then through forest. After what feels like hours, you finally emerge at a beautifully situated rustic yurt!
The views are stunning as is the wood-fired hot tub (oh the luxury!), outdoor shower and freshly baked bread, croissants, eggs, bacon and more goodies for breakfast.
Amazingly, we got true French croissants, and yes, all gluten-free!, when we stayed as the owners were away and our host was a lovely French lady instead.


We were lucky and had the entire guest area to ourselves. There are two bedroom yurts on site so you may be sharing the kitchen yurt and toilet/shower facilities with someone else. I think this would really put a damper on your experience but if you’re a bigger group it could work perfectly and still offer you the privacy we enjoyed.

The hike back up to the trail the next morning is absolutely no fun but is so worth it for the rustic accommodation, the hot tub and the breakfast.
CAMPING OPTION: BAY OF MANY COVES (36.4KM)
BAY OF MANY COVES CAMPSITE (DOC)
FACILITIES: Drop toilet, water, picnic tables, cooking shelter
CAPACITY: 14 people
COST: $10 pp/pn - pre-bookings required
The Bay of Many Coves campsite is very happily situated along the ridgeline and provides gorgeous views over the sounds.


Sunsets from here are probably stunning.
There are a couple of picnic tables here, and also a basic and very small cooking shelter. It’s a great spot for lunch.
DAY 4: NGAHERE HOU – MISTLETOE BAY | 20KM (WITH SIDE TRIP: ~22KM)
This morning we said good-bye to a very special stay and began our way back to the Queen Charlotte Track.
After a slow and exhausting climb up to the QCT from Ngahere Hou, it was mostly downhill(ish) until we started the uphill section to Black Rock campsite.

Day 4 was pretty much our favourite day (minus the early morning climb).
It felt like we were getting fantastic views over Kenepuru Sound or Queen Charlotte Sound all day depending on how the trail was hugging the ridge.


The nice thing about the ridge section also is that there are plenty of picnic tables and benches along the way, perfect for morning tea and lunch spots.

Once we’d dropped down to Torea Saddle (where we would have stayed at the Portage Hotel the previous night had it not been for the flooding), we had another 8km to go, starting with a gruelling near-400m elevation climb.
The weather was a bit funny, the quintessential Melbourne weather of four seasons in one day. It was sunny, then suddenly turned, the winds blew in and it started drizzling.
After a few hours of this, we almost gave Onehau Lookout (416m) a miss because it looked like storm clouds were coming (plus I was getting very tired). But luckily we persisted on the uphill track because we were rewarded with stunning vistas over the sounds!

I was very glad once we reached the turnoff to Mistletoe Bay only to realise that it was another 1.5km along a side track.
SIDE TRIPS: ONEHAU LOOKOUT & JAMES VOGEL TRACK
There’s a couple of side trips after Torea Saddle: Onehau Lookout (1.8km return) and James Vogel Track (1.5km one-way) ending at Mistletoe Bay.
Onehau Lookout is up, up and up, and not surprisingly, culminates in panoramic 360° views! There’s a picnic table at the top and depending into how you slice your hike makes for a great lunch spot.

The James Vogel Track is probably only worthwhile if you’re staying at Mistletoe Bay. It’s a very rooty and steep forest track that descends from the QCT down to the bay.

It’s a lovely forest track, the husband enjoyed it a lot. I couldn’t really appreciate it because I was busting to go to the toilet and was racing down the track to get to the campground! 🙂
ACCOMMODATION: MISTLETOE BAY ECO VILLAGE
Mistletoe Bay was another incredible surprise!

It turned out that because Kenepuru Road was still closed (another casualty of earlier destructive storms), nobody could actually reach the campground other than hikers and people coming in by boat.
So… we were the only people staying at the eco village that night. That it was somewhat surreal having an entire campground to oneself would be a minor understatement.

We have never stayed in a campground this quiet. It was utter bliss.
We stayed in a two-bunk Whare (cabin) and spent the afternoon drinking coffee (especially made for us) and wandering the grounds and the peninsula.


The cabin at Mistletoe Bay felt much more like other hikes in that the mattress was slightly worn and the bedding far less cozy. But when you have an entire campground to yourself, you hardly care about that.
CAMPING OPTIONS: BLACK ROCK (45.8KM), COWSHED BAY (51.9KM) AND MISTLETOE BAY ECO VILLAGE (59KM)
BLACK ROCK CAMPSITE (DOC)
FACILITIES: Drop toilet, water, picnic table, cooking shelter
CAPACITY: 14 people
COST: $10 pp/pn - pre-bookings required
Black Rock campsite is just as nicely located as the Bay of Many Coves site, and also has a couple of picnic tables. The campsites are on the Kenepuru Sound side while the very basic cooking shelter has views into Queen Charlotte Sound.


COWSHED BAY CAMPSITE (DOC)
FACILITIES: Flush toilets, (cold) shower, water, picnic tables, cooking shelter
CAPACITY: 35 people
COST: $10 pp/pn - pre-bookings required
Further along near the Portage Hotel is Cowshed Bay campsite. It’s along Kenepuru Road so it’s not a hikers-only campsite but gets used by car campers as well. In return, you have flush toilets and cold showers.
I remember briefly looking at it (in a van) a few years earlier when we had finished the Abel Tasman Great Walk. It didn’t strike me as amazing though it has lovely access to Kenepuru Sound.
MISTLETOE BAY ECO VILLAGE
FACILITIES: Flush toilets and hot showers, water, kitchen hut
CAPACITY: 40 unpowered campsites
COST: $ 18 pp/pn
Instead of staying in a cabin at Mistletoe Bay Eco Village, you could just as easily camp though you’ll share the area with car campers.


You’ll have access to the large kitchen hut (including microwave, hot plates, fridge), can get a hot shower and probably also a coffee.
DAY 5: MISTLETOE BAY – ANAKIWA | 12KM (NO SIDE TRIPS)
On our last day, we meandered so much that we only got on our way just before 9:30am.
Once we were back on the track, we barely had 11km to go before hitting Anakiwa. With a 3:30pm water taxi departure, we had ample time left to enjoy the trail.
The weather was simply gorgeous on our last day.

After a slight elevation increase, it was downhill for the rest of our Queen Charlotte Track adventure.
The closer you get to Anakiwa the wider the track becomes, and with picturesque views into Grove Arm, the walking became very light and fun.

The last few kilometres are through forest until you reach the Anakiwa settlement and are back to civilisation.

We found this part of the track the busiest with day hikers and families out on bikes exploring the trail.
By 2pm we’d hit the end and after the obligatory end-of–hike photo, we just wandered around the foreshore and relaxed until our water taxi arrived.
CAMPING OPTIONS: DAVIES BAY (69.2KM)
DAVIES BAY CAMPSITE (DOC)
FACILITIES: Drop toilet, water, picnic table, cooking shelter
CAPACITY: 45 people
COST: $10 pp/pn - pre-bookings required
Davies Bay is the last (or first) camping area on the Queen Charlotte Track and quite close to Anakiwa. There’s a cooking shelter with a lovely deck, and a couple of picnic tables.

FINAL THOUGHTS
The Queen Charlotte Track is the first hike where we haven’t carried our own gear. It certainly felt like luxury, especially the comfy beds and having a shower every night!
But whether you enjoy having a lighter load for a few days or preferring to camp under the stars, the Queen Charlotte Track will take you through beautiful coastal scenery. You don’t ever feel far from civilisation here but hiking the track is a very relaxing way to experience the Marlborough Sounds.
Happy hiking,

MORE POSTS ON MULTI-DAY HIKES IN NEW ZEALAND AND AUSTRALIA
- The Abel Tasman Coast Track is close by and a fantastic Great Walk on the South Island. It’s also accessible year-round and much more affordable if you want to sleep in a bed (albeit a bunk bed) every night.
- Without a doubt, the iconic Milford Track is New Zealand’s most impressive Great Walk. It’s hard to get in but if you do, you won’t regret it. It’s simply breathtaking.
- Almost as hard to get in as the Milford Track is the nearby Routeburn Track in the Southern Alps. It’s a spectacular trail.
- For an amazing long-distance hike in Australia, head to the Larapinta Trail in Central Australia. Exhilarating would be an understatement.
- Although not so easy to get to, the Kangaroo Island Wilderness Trail in South Australia is another great option, especially if you haven’t done much camping on hikes.
SAVE TO PINTEREST


No Comments