
This post contains affiliate links. If you buy something through these links, I may earn a small commission at no extra cost to you. I only recommend gear I’ve actually used out on the trails and really loved! Read my full disclaimer.
The Larapinta Trail is on Arrernte Country. I acknowledge the Traditional Custodians of this area and their connection to Country, and pay my respects to their Elders past and present.
Central Australia has pulled on our hearts since we first visited parts of Tjoritja (West MacDonnell) National Park back in 2017. For years, we discussed hiking the entire Larapinta Trail.
We almost hiked it in 2022 but Alice Springs was booked solid and flights were non-existent. In hindsight, failing to get there was a blessing.
Between the post-COVID crowds and the literal plague of mice chewing through tents and boots, 2022 wasn’t the year to be there. By the time we actually stepped onto the trail, the ‘armies of mice’ had vanished.
I think I may have spotted a single, lonely mouse scuttling away from our tent once, and that was it.

The extra year of waiting gave me more time to mull over the logistics and get a bit fitter—which turned out to be necessary for a trail this unforgiving.
THE LARAPINTA TRAIL: QUICK STATS
THE LARAPINTA TRAIL AT A GLANCE

OUR LARAPINTA LOGISTICS
Here’s a quick overview of how we divvied up the 230 km trail:
- Direction: West to East (Redbank Gorge to Alice Springs)
- Sections: 11 (skipped Section 12)
- Duration: 16 (15 hiking days + 1 rest day)
We had already hiked up Mount Sonder previously so chose to skip it for our Larapinta hike. Allocating 16 days was enough time to do the trail with the flexibility we needed.
OUR 16-DAY ITINERARY: THE SECTION BREAKDOWN
The below is not our planned itinerary but what actually happened on the trail. The first six days went more or less as planned but from then the timing and distances took on a life of their own.
Distances are from the “Larapinta Trail” guidebook by John Chapman. In reality you’ll walk much more since you lose the trail, take photos or backtrack, so you end up walking a lot more than what any trail markers or books might tell you.
| Day | From / To | Section | Distance (km) | Notes |
|---|---|---|---|---|
| Sections 11 – 10: Redbank Gorge to Ormiston Gorge | ||||
| 1 | Redbank Gorge to Hilltop Lookout | 11 | 16.2 | Eased into hike & broke pack strap |
| 2 | Hilltop Lookout to Finke River | 11 | 9.6 | Stayed for gear repairs |
| 3 | Finke River to Ormiston Gorge | 10 | 8.9 | Food Drop #1 |
| Sections 9 – 8: Ormiston Gorge to Serpentine Gorge | ||||
| 4 | Ormiston Gorge to Hermit’s Hideaway | 9 | 10.5 | First dry camp—loved the shade here |
| 5 | Hermit’s Hideaway to Serpentine Chalet Dam | 9 | 18.7 | Stunning vistas |
| 6 | Serpentine Chalet Dam to Serpentine Gorge | 8 | 13.8 | Food Drop #2 |
| Sections 7 – 4: Serpentine Gorge to Standley Chasm | ||||
| 7 | Serpentine Gorge to Rocky Gully | 7 | 25.8 | Big day—double section |
| 8 | Rocky Gully to Hugh Gorge | 6 | 15.3 | – |
| 9 | Rest Day | – | 0 | Rain all day |
| 10 | Hugh Gorge to Fringe Lily Creek | 5 | 7.3 | Swim & side trip into Upper Hugh Gorge |
| 11 | Fringe Lily Creek to Stuart’s Pass | 4-5 | 11.8 | Miserable weather |
| 12 | Stuart’s Pass to Standley Chasm | 4 | 14.1 | Icy weather over Brinkley—Food Drop #3 |
| Sections 3 – 1: Standley Chasm to Alice Springs | ||||
| 13 | Standley Chasm to Millers Flat | 3 | 5 | Rain delay |
| 14 | Millers Flat to Mulga Camp | 3-2 | 18.4 | First sunshine in a week |
| 15 | Mulga Camp to Wallaby Gap | 2-1 | 25.3 | Big day |
| 16 | Wallaby Gap to Alice Springs | 1 | 13.5 (+ 5km to acc) | Trail end + walk to accommodation |
Note: Distances listed are from the John Chapman guidebook. Actual distances walked varied due to weather, gear repairs, photo stops and trail deviations.
If the table above is too overwhelming for you, I’ve written up the actual day-by-day in my trip reports for Sections 11-10 (Redbank Gorge to Ormiston Gorge) and Sections 9-8 (Ormiston Gorge to Serpentine Gorge).
As is normal, our itinerary shifted constantly.

We needed to camp at Finke River because we had a backpack to fix before we could move on. Hermit’s Hideaway wasn’t planned but we stayed for the shade on a hot day instead of pushing on. We wanted to camp at Ellery Creek North but with bad weather coming, we decided to move on. At Standley Chasm, we waited until lunchtime for the rain to stop and only made it as far as Millers Flat that day.
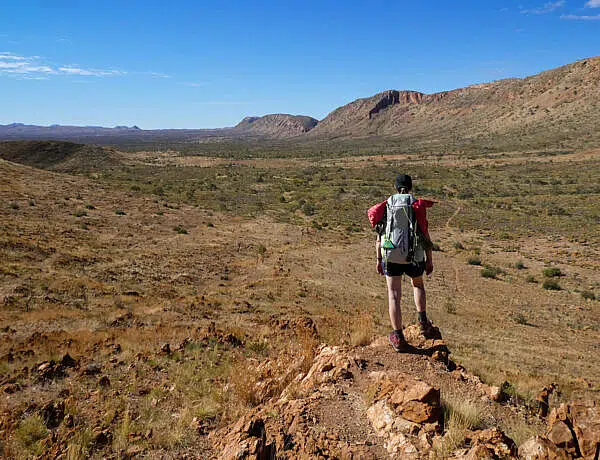
THE HIKE: 16 DAYS OF DESERT, DUST AND RAIN
One of the first questions friends and family asked when we returned is ‘would you do it again?’, and both of us have the same reaction: ‘yes, in a heartbeat’! In fact, it’s not yet been eclipsed by any other hike on our list of best multi-day hikes in Australia.

The Larapinta Trail is a breathtaking hike that takes you through some of the most incredible desert mountain ranges you’ll ever see. You’ll also quickly learn that the desert can be hilly. Quite hilly.
PHYSICAL TOLL: ACHES & BLISTERS
On the whole, things went well.
I had no food issues, almost no headaches, no heat exhaustion and very little anxiety. My immune system basically held it together for the hike.
My foam roller (yep, we carry one), strapping tape, muscle rub and magnesium supplements managed most of my muscle aches, knots and skin chafes. Both of us only got a blister on the very last day!
I attribute mine to wearing damp/wet socks for the last few days, then switching to a dry but hardened pair on the very last day. I ignored the hot spot on my toe—a big no-no—because we were almost back in Alice. By the time we’d actually finished, I had a nice full-blown blister on my right little toe.
GEAR FAILURES & DESERT RAIN
We did, however, have equipment failures (the husband’s backpack, my sleeping bag zipper and my Nemo mat) and atrocious weather for about three, four days. Crossing Brinkley Bluff (Section 4) I was frozen to the core and it took me hours to warm up again once at Standley Chasm.

Hiking in the rain and freezing cold is no fun, hiking in the rain when you’re in the desert and don’t expect rain of such magnitude is even less fun. Packing up wet gear in the rain and wearing wet boots is even less less fun.
UNDERFOOT: DEALING WITH THE QUARTZITE
Our hiking boots worked well. The husband had bought a new pair of Merrells last minute due to ankle problems and luckily had no issues. My Oboz Bridger boots were well-worn anyway but now look suitably more “shredded” than they did before.


The Larapinta is definitely not a walk in the park—the ground is rocky, hard and sharp. Quartzite is no friend to boots or clothes.
TERRAIN: THE MYTH OF THE FLAT TRAIL
We weren’t expecting an easy trail, and it wasn’t.
While some stretches are almost flat, the trail is actually undulating. Sections that look like they’re flat on the maps, are generally not flat. They’re up and down little hills which get pretty tiring when you’re not a 25-year-old bouncy pony anymore.

You’ll also spend plenty of time in dry, rocky or sandy creek beds—slow and painful after a while—and boulder scrambling through gorges—always easier up then down, especially with a heavy pack.
THE HIGHS AND LOWS: OUR SECTION HIGHLIGHTS
We really loved the whole trail.
Some hikers dismiss Section 6 as a boring valley crossing but we found it amazing. Crossing the valley floor offered a fantastic perspective of the Chewings and Heavitree Ranges—though the constant up and down does get a bit tedious toward the end.

This section is entirely exposed. In full sun on a hot day (anything over 25°C), it would probably be less than pleasant.
THE HIGHLIGHTS: SECTION 9 AND 5
Section 9 is one of the hardest but most breathtaking parts of the trail.
We broke the 29km stretch into two days, which was the right decision. We loved every kilometre until the final two, when heat and running out of water meant I’d had enough of the exposed trail. There’s not that much to see once you’re past Inarlanga Pass.

Section 5 turned out to be another favourite.
I didn’t much like the swim in Hugh Gorge through icy water but it was only short and I was clean again. Upper Hugh Gorge is simply stunning as are the views from Razorback Ridge.
THE CHALLENGES: SECTIONS 6 AND 4
There really aren’t any bad sections on the Larapinta Trail.
Some sections, or rather parts of sections, are less enjoyable than others (usually the final two kilometres, which always seem to drag on beyond what they rightly should!) but on the whole the entire trail is really fantastic.


We didn’t really appreciate the end of Section 5 too much when we were going through Rocky Talus (a steep boulder-strewn creek bed) and Spencer Gorge (equally boulder-strewn and requiring a lot of rock navigation skills) in the rain. Every step in the creek bed and gorge was onto more slippery rock, it was cold and clammy, and we were starting to get really wet.
In normal conditions, I imagine Spencer Gorge looking quite wonderful in the early morning but our experience was less than fun.
For me, Section 4 was the hardest and least appealing because the conditions were horrendous. We crossed Brinkley Bluff in pouring rain, strong icy side winds and subzero temperatures. It’s the highest elevation on the trail after Mount Sonder and in very windy conditions it’s downright dangerous.

The ascent from Section 4/5 is steep and the trek across Brinkley can feel very, very long in bad conditions.
The trail narrows in some sections, and became slippery. Low visibility due to fog made it hard to actually see the trail. We lost the markers several times, adding significant stress to an already physical day.
I’d go back in a heartbeat to do it again so I can revise my opinion of Brinkley!
POST-HIKE ANALYSIS: LOGISTICS AND REALITY
Post-hike, you’re always smarter.
While our months of planning paid off, the “unpredictable and crazy” weather event that gave us almost a week of incessant rain proved that you need to be prepared for anything.
A Note on the Desert Rain: It does rain in the desert—even in winter—but it’s usually light and only for a day. So pack at least a lightweight rain jacket and a dry bag for your electronics. Our weather experience was a bit more of a freak event that affected the entire top half of Australia.
Despite the backpack and mat failures, most of our gear worked super well. If you’re interested in our full equipment list, you can read more about what worked and what we’d change.
1. DIRECTION: WHY WEST TO EAST (W2E) WORKED
We started at Redbank Gorge and walked back to Alice Springs. This is the less popular option but we have no regrets, even though we walked ‘away’ from Mount Sonder.

- Anxiety & Easing In: Starting from Redbank Gorge meant we could ease into the hike and take it slow for the first few days. We had a few shorter days and less food to carry until our first food drop at Ormiston Gorge. Walking back toward “safety” and civilisation was also very helpful for my initial anxiety.
- The Sun & Wind: Walking into the morning sun wasn’t an issue because you rarely actually walk due east. More importantly, the prevailing southwest winds were at our backs rather than in our faces—a big bonus given the frequently icy breezes on the trail.
- The Verticals: W2E means some steeper ascents and a few more gradual descents. Since we both “prefer” a steep climb to killing our knees on steep downhills, this suited us well.
- Mount Sonder Factor: We skipped Section 12 this time because we’d already done it on a previous trip. We just didn’t feel the need to climb it again this time, and would have had to stay the first night at Redbank Gorge. But if you’ve never done it, definitely don’t miss it.
2. PACE: WHY 16-DAYS WORKED
We spent 15 nights on the trail, which allowed for a weather-induced rest day and side trips like Upper Hugh Gorge.
- Flexibility: A longer itinerary meant we had time and didn’t need to rush through the longer or tougher sections. If we did it again, we would spend 16 days again or even longer so we could climb Mount Sonder, add the Ormiston Pound walk (again) or explore the trail towards Glen Helen.
- Physicality: While ultra-light hikers tend to hike the trail in far less time, our pace allowed us to enjoy the campsites, have time for side trips, and reduce our risk of injury.
3. CAMPSITES: WHERE WE STAYED
We enjoyed a fairly quiet camping experience on the whole. We had four busy campsites (15+ people—Rocky Gully had 25+), three sites entirely to ourselves and the rest with between one and five other hikers.

We mostly camped at the trail heads (though we never slept in the shelters, I prefer our tent) or campgrounds with water tanks. However, our five dry camps provided the best views and most peaceful experiences:
- Hilltop Lookout: Busy, but offers incredible views of Mount Sonder.
- Hermit’s Hideaway: Our favourite site with stunning ridge views.
- Fringe Lily Creek: A very nice, quiet spot.
- Stuart’s Pass: A great site, though we had terrible weather there.
- Millers Flat: Would have offered steep valley views if the weather had been amenable.
4. HYDRATION: WATER IN THE DESERT
We filtered everything.
While we mostly relied on the water tanks, we also drew from rainwater pools at Fringe Lily and Stuart’s Pass, and Hugh Gorge Creek. Relying on rainwater is not a given in a dry year—it just so happened that we had plenty of rain so we were confident we’d find rainwater.
Field Notes: Water Filtration
We used the Grayl Geopress to filter every litre of water we drank. It’s definitely bulkier than a straw filter, but it is incredibly fast and effective at removing almost all waterborne pathogens and sediment when we had to draw from rainwater pools. Being able to ‘press’ clean water in seconds when you’re exhausted at the end of the day is worth it.
Check out the Grayl Geopress Purifier →
Find my full hydration and filtration setup in my full Larapinta gear list.
5. FOOD DROPS & “SNACK FATIGUE”
We organised three food drops: Ormiston Gorge, Serpentine Gorge and Standley Chasm.

- The Boxes/Gear Retrieval: Serpentine Gorge and Standley Chasm included gear retrievals, allowing us to swap out power banks, camera batteries and fresh socks. Not to mention leaving gear behind that we no longer needed. I would organise gear retrievals for each box next time to allow us to leave unwanted gear and food behind (I tend to overpack…).
- The ‘Freebie’ Boxes. All food drops had ‘giveaway’ boxes where I left plenty of snacks. But we also picked up tissues that I’d forgotten and a couple of other small items. They’re like mini ‘swap meets’. 🙂
- The Mistake: Too many snacks. A common mistake but I seem to be particularly affected (even after many hikes) by overpacking food, especially muesli bars. I ended up giving away chocolate and treats or leaving food behind in our gear retrieval boxes.
Gluten-free on the track? Managing strict dietary requirements in the outback requires serious planning. I’ve written a complete Larapinta Gluten-Free Food Guide detailing our full 16-day meal setup, food drop logistics and favourite Australian and NZ dehydrated brands.
6. EQUIPMENT FAILURES: THE “FIX-IT” REALITY
Gear will fail on a 230km trek. The husband needed to make three major, “creative” repairs:
- Backpack: A broken harness strap on the husband’s pack on Day 1 (temporary fix).
- Sleeping Bag: A broken zip on my trusty “fluffy” down sleeping bag on Day 5 (required a very slow “worming” technique for the rest of the trip).
- Sleeping Mat: An unfindable leak on Day 10. The husband had to re-inflate the mat every two hours for the final six nights. Ended up being a product fault, not a puncture and a straightforward warranty replacement later.
- The Takeaway: A comprehensive “fix ’em” repair kit isn’t optional—it’s essential for the Larapinta.
Field Notes: The Tent
The Mont Moondance 2 basically lived its best life during that week of horrendous weather, even if we didn’t. It got completely saturated and was dripping wet on the outside for days on end but we stayed dry inside. It’s an investment for sure but you really need a shelter that won’t turn into a bathtub when the desert weather turns.
Check out the Mont Moondance 2 →
See how I packed the rest of my shelter system in my full Larapinta gear list.
LARAPINTA LESSONS: WHAT WE’D DO DIFFERENTLY NEXT TIME
Aside from the gear failing, here are the random lessons we picked up along the way.
- Don’t bother taking a book. Neither of us read a single page. We were either too busy hiking, sorting out food drops, exploring the area, talking to other hikers, prepping for the next day (e.g. filling up water bladders, sorting out snacks), setting up the tent, taking photos, fixing equipment, trying to stay warm or making endless cups of tea.
- Don’t bring freeze-dried strawberries. They just make a mess. Dried pineapple, however, worked great and I’m so glad I included it in my daily snacks. I could have eaten kilos of it.
- Don’t bring too many snacks. For each day, I allocated 2x muesli bars, 1x 50g portion of gummy snakes, 3-4 dried pineapple rings, 1x afternoon treat (lamington snack ball or similar), 1x dried chickpeas for something salty and 2x peanut butter corn thin sandwiches. I could not eat all this every day, and ended up ditching a lot of the snacks (mostly muesli bars) in our food drops or gifting them to hikers on the ‘not enough snacks’ spectrum.
- Don’t pack too many treats in your food drops. I packed a lot of treats for our food drop nights, from oranges (great choice!) to rice crackers with cheese, chips and more. Again, it was too much to eat in one night and too bulky to carry along. I left a lot of treats behind.
- Hiking poles are a must. But they do take getting used to and can put a strain on your shoulders since you’re suddenly hiking “with” your shoulders as well. If you have no shoulder or neck issues, you probably won’t even notice.
- Take a belt or some rope to keep your pants up. I had lost so much weight by the end that my pants literally fell off my hips. Luckily my shorts are elastic so they stayed up somewhat better.
- If you do double sections, your body really feels it (if you’re older). Unless, of course, you’re ultra-fit or a 25-year-old bouncy pony. Single sections or our average 15km were fine, anything above 20km put too much strain on my body; my feet and legs would really feel it.
- We carry a personal locator beacon (PLB) and a GPS (mostly for elevation information) on our outback adventures but together they’re quite heavy. It’d be more efficient to ditch the GPS or get something like the Garmin InReach that combines the two. They’re smaller and lighter.
Need the gear specifics? If you want to see exactly what we carried (and what actually survived the quartzite), I’ve put together a Larapinta Gear List covering our shelter, sleep and pack setup. It’s basically everything that didn’t break or fall apart before we reached Alice Springs.
Happy Larapinta Trail planning,

SAVE TO PINTEREST


1 Comment
Jake
7 March 2024 at 2:54 PMExcellent report thanks.